
Fitting stall mats to a non-standard stall size comes down to three options: trimming standard mats to fit, combining multiple mats to cover the space, or ordering custom-cut mats made to your exact dimensions. For most irregular stalls, a combination of careful measuring, straight cuts with a utility knife, and a custom order for any awkward edges will give you the cleanest, most durable result. Read on for a step-by-step breakdown of each approach.
What are stall mats and why do stall size and fit matter?
Stall mats are thick rubber floor coverings designed to sit on top of concrete, dirt, or wood stall floors. They cushion joints, improve grip, reduce slipping, and provide insulation from cold surfaces. A well-fitted stall mat system protects your horse’s legs, encourages rest, and helps reduce horse bedding costs because less bedding is needed to compensate for a hard or uneven floor.
Fit matters more than most people expect. Gaps between mats—or between a mat and the wall—create pockets where urine, manure, and moisture collect. That leads to ammonia buildup, bacterial growth, and accelerated floor damage. A mat that shifts or bunches becomes a tripping hazard. Getting the fit right from the start means a cleaner stall, a healthier horse, and far less time spent rearranging mats every morning.
What counts as a non-standard stall size?
A non-standard stall size is any stall that does not match the dimensions most standard rubber mats are designed for. Most stall mats come in 4×6-foot panels, so a stall that does not divide evenly into 4×6 sections is considered non-standard. Common examples include 10×10, 11×11, 12×14, and round or angled-corner stalls.
Non-standard situations also include stalls with built-in features like feed doors, drain covers, support posts, or uneven walls. Older barns are particularly common offenders because stall dimensions were often built to suit the timber available rather than a set standard. Even a stall that is close to a standard size can cause problems if a single mat does not bridge the gap cleanly and leaves an awkward strip along one wall.
What are your options for fitting mats to an irregular stall?
You have three main options when fitting mats to an irregular stall: cut standard mats to fit, combine multiple standard mats to cover the space with minimal gaps, or order custom-cut mats sized to your exact stall dimensions. The right choice depends on the complexity of the shape, your tools, and how permanent you want the installation to be.
Cutting standard mats yourself
This works well for simple rectangular adjustments, such as trimming a few inches off a mat to fit against a wall. It requires a straightedge, a sharp utility knife, and some patience. The downside is that you are working with heavy rubber, and even a slightly uneven cut can leave a visible gap or a raised edge.
Combining standard mats
For stalls that are close to a standard size, you can lay full mats across most of the floor and use a trimmed mat to fill the remaining strip. This approach minimizes waste and keeps cutting to a minimum. The key is making sure the seam between mats sits in a low-traffic area where a horse is less likely to paw at it.
Ordering custom-cut mats
For stalls with unusual shapes, angles, or built-in obstacles, a custom order is often the smartest route. You provide the measurements, and the mats arrive ready to drop in with little or no modification needed. This is also the best way to minimize seams, which reduces ammonia traps and simplifies cleaning.
How do you measure a non-standard stall accurately for mats?
Measure a non-standard stall by taking the length and width at multiple points, not just once across the middle. Stall walls are rarely perfectly parallel, especially in older barns, so measuring in at least three places along each wall gives you the actual dimensions rather than an assumed average.
Use a steel tape measure rather than a fabric one, which can stretch and give inaccurate readings. Write down every measurement as you go, and sketch a rough floor plan with all the numbers marked on it. If the stall has a drain, post, or door threshold, measure the distance from the nearest wall to that feature in both directions. For any angled corners or curved walls, note the angle or trace the shape onto paper so you have a reference when planning your mat layout or placing a custom order.
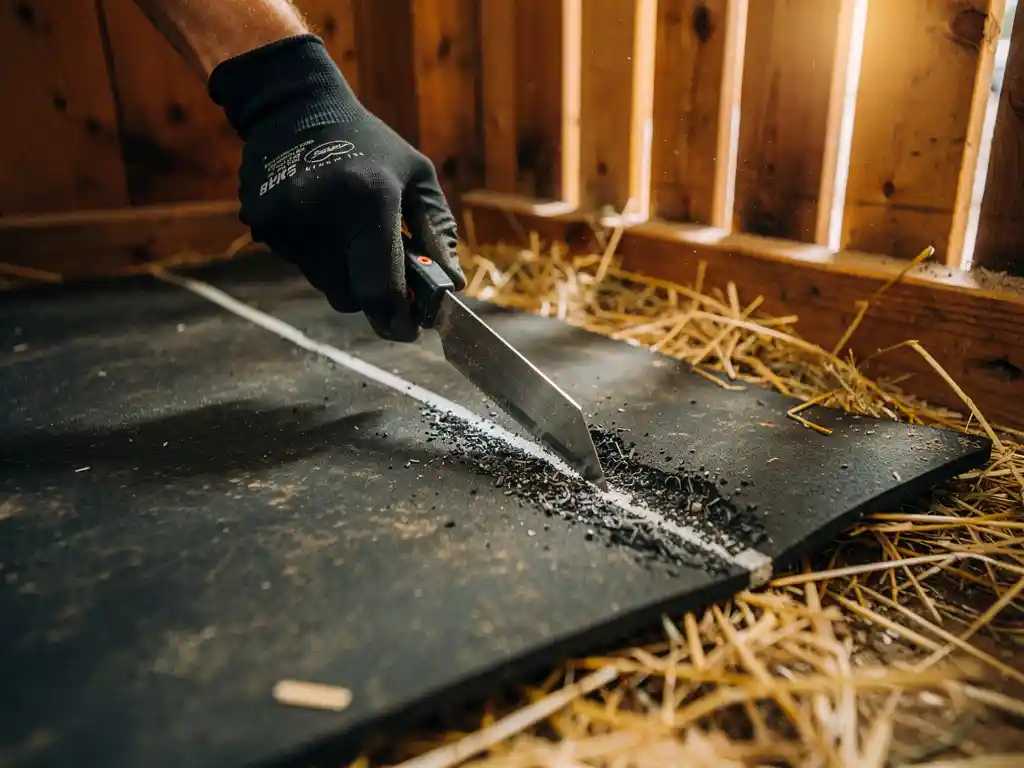
How do you cut rubber stall mats to fit an unusual shape?
To cut rubber stall mats, use a sharp utility knife or a circular saw with a fine-tooth blade. Mark your cut line clearly with chalk or a straightedge, score the surface first with a shallow pass, then cut through in one or two firm, controlled strokes, following the scored line. Work on a flat surface so the mat does not flex and throw off your line.
For straight cuts, a metal straightedge clamped to the mat gives you a reliable guide. For curved or irregular cuts, use a jigsaw with a rubber-cutting blade and move slowly to keep the line clean. Thick mats, particularly those made from fiber-reinforced rubber, resist cutting more than standard mats, so a sharp blade makes a real difference. Replace the blade as soon as it starts to drag rather than cut cleanly. Always cut slightly outside your line on the first pass and trim back to the exact measurement if needed, since you cannot add rubber back once it is removed.
When should you order custom-cut mats instead of cutting them yourself?
Order custom-cut mats when the stall shape is complex, when you want to minimize seams across the entire floor, or when the mats you need are made from fiber-reinforced rubber that is difficult to cut cleanly with hand tools. Custom cutting is also worth considering when you have multiple stalls of the same non-standard size, since the time and effort saved across an entire barn adds up quickly.
Self-cutting makes sense for simple rectangular trims where you need to remove a predictable strip from one edge. But if your stall has angled corners, a post in the floor, or an irregular shape that requires multiple cuts on a single mat, the margin for error grows quickly. A poorly cut mat that does not lie flat or leaves a gap along a wall can actually cost more in the long run through increased bedding use and more frequent cleaning. For high-use stalls where you want a permanent, clean installation, a custom order is usually the more practical and cost-effective choice.
How do you secure and finish stall mats in a non-standard space?
Secure stall mats in a non-standard space by butting them tightly against each other and against the walls, using the weight of the mats themselves to hold them in position. For stalls where mats tend to shift, rubber mat tape or interlocking edges between panels can add stability without adhesive, which makes future removal easier.
For a clean finish along walls, make sure your edge cuts are straight and sit flush rather than riding up the wall. A small gap between the mat edge and the wall is better than a mat that buckles upward, since a buckled edge creates a trip hazard. If you have an irregular gap along one wall after fitting your main mats, a custom-cut filler strip is the neatest solution.
If you are working with slatted concrete floors, a purpose-built fastener system holds mats securely without adhesive and keeps them animal-friendly and easy to remove for cleaning. For non-standard stalls where a precise, seam-minimized fit genuinely matters, our custom rubber matting solutions at LRP Matting are made to your exact dimensions, so the mats arrive ready to install with no guesswork, no awkward gaps, and no time spent wrestling with a utility knife. If reducing horse bedding costs is part of your goal, a well-fitted mat system is one of the most practical steps you can take.
Frequently Asked Questions
How thick should stall mats be for a horse stall with a non-standard size?
For most horse stalls, a mat thickness of ¾ inch (about 17–19mm) is the standard recommendation, as it provides adequate cushioning for joints and insulation from cold floors without being so heavy that cutting and repositioning becomes unmanageable. If your horse is heavier, older, or prone to joint issues, stepping up to a 1-inch mat offers extra support. Keep in mind that thicker mats are significantly harder to cut cleanly yourself, so if you are going beyond ¾ inch in a non-standard stall, a custom order is often the more practical route.
What is the best way to handle a gap that is too small to fill with a standard mat but too large to ignore?
A gap that falls in the awkward range — typically anything between 2 and 8 inches — is best filled with a custom-cut filler strip rather than leaving it open or trying to stretch an existing mat. Leaving even a small gap along a wall creates a channel where urine and manure collect, which accelerates ammonia buildup and floor damage. You can order a single custom-cut strip to match your existing mat thickness and rubber type, or carefully trim a scrap piece from a previous cut if the edge quality is clean enough.
Can stall mats be laid directly on a dirt floor in a non-standard stall, or does the subfloor need preparation first?
Stall mats can be laid on a dirt floor, but the surface needs to be level, compacted, and well-drained before the mats go down — otherwise the mats will shift, sag into soft spots, and create uneven seams over time. Fill any low spots with compacted stone dust or fine gravel, and make sure the floor slopes slightly toward a drain if possible. A poorly prepared dirt floor will undermine even a perfectly measured and cut mat installation, so taking the time to grade and compact the surface first is well worth the effort.
How do you prevent stall mats from shifting or creeping in a non-standard stall where the walls do not hold them square?
The most effective approach is to fit the mats as tightly as possible against all four walls, since the walls themselves act as the primary restraint when mats are cut to the correct dimensions. For stalls where walls are uneven or angled and cannot provide consistent pressure, rubber mat tape along seams and interlocking mat edges between panels add stability without requiring adhesive. Avoid using construction adhesive unless the installation is truly permanent, as bonded mats are extremely difficult to remove for cleaning or replacement.
How often should stall mats in a non-standard stall be lifted and cleaned underneath?
As a general rule, stall mats should be lifted, cleaned underneath, and allowed to dry at least two to four times per year, with more frequent checks in high-use stalls or in warm, humid climates where moisture and ammonia accumulate faster. Even a well-fitted mat system with minimal seams will trap some moisture over time, and allowing that to go unchecked leads to floor damage and persistent odor. A well-fitted mat installation makes this process easier because there are fewer gaps for debris to work into, so each cleaning session takes less time.
Is it possible to mix mat thicknesses or rubber types in the same non-standard stall?
Mixing mat thicknesses in the same stall is generally not recommended, as even a small height difference between adjacent mats creates a raised edge that can catch a hoof and become a trip hazard over time. If you need to use different rubber types — for example, a fiber-reinforced mat in a high-wear zone and a standard mat elsewhere — make sure they are the same thickness and that the seam between them sits in a low-traffic area. When in doubt, ordering all mats from the same supplier and the same product line ensures consistent thickness and density across the entire floor.
What common mistakes should I avoid when fitting mats to a non-standard stall for the first time?
The most common mistakes are measuring only once across the middle of the stall (missing wall irregularities), cutting mats too aggressively on the first pass without leaving a small margin to trim back, and placing seams directly under high-traffic areas where a horse stands, turns, or paws most frequently. Another frequent error is skipping subfloor preparation and expecting the mats to compensate for an uneven surface — they will not. Taking the time to measure in multiple places, cut conservatively, and plan seam placement before laying a single mat will save you significant rework and expense.