
Horse stall mats shift and creep because of horse movement, uneven floors, and the natural flexibility of rubber. To stop them from moving, start with a clean, level base; use heavy interlocking or large-format mats; fill the stall edge to edge; and add rubber-safe adhesive or fasteners in high-movement areas. A tight, well-fitted installation is your best defense against shifting mats.
If you have been dealing with bunched-up mats, gaps between panels, or a horse standing on a slippery bare patch, you are not alone. This is one of the most common frustrations in stall management, and the good news is that it is almost always preventable. Let’s walk through everything you need to know, from choosing the right mat to keeping it exactly where you put it.
Why do horse stall mats keep shifting and moving?
Horse stall mats shift because horses are constantly moving, pawing, lying down, and getting up, which generates significant lateral and rotational force on the floor surface. When mats are too small, too light, or placed on an uneven or dirty base, that movement has nowhere to go except into the mat itself.
There are a few specific reasons this happens more in some stalls than others. Lighter mats with smooth undersides have very little grip on concrete or compacted stone dust, so even small movements add up over time. Mats that don’t cover the full stall floor leave gaps at the edges where rubber can curl or slide. And if the base underneath is not level, mats will always migrate toward the low points.
Horses that paw at the ground, spin in their stalls, or are particularly active during feeding time put extra stress on mat edges and seams. Over days and weeks, this constant micro-movement causes mats to creep away from walls and from each other, creating the gaps and bunching you probably recognize. Understanding the cause makes the fix a lot more straightforward.
What type of rubber mat works best for horse stalls?
The best horse stall mats are thick, heavy, and made from solid vulcanized rubber with a textured or studded underside for grip. Mats that are at least 3/4 inch thick provide enough weight and rigidity to resist movement, while a textured underside creates friction with the base layer beneath.
Thickness and weight matter more than you think
A heavier mat simply moves less. Our 4×6 Stall Mat, for example, weighs between 91.5 and 115 pounds depending on thickness, and that mass alone does a lot of the stabilizing work for you. Thinner, lighter mats might be easier to handle during installation, but they are far more prone to shifting under daily horse traffic.
Our Econo Mat is a great option when budget is a consideration, and it is still made from genuine rubber with real grip and durability. For permanent, heavy-use installations, though, the extra thickness pays off quickly in reduced maintenance and fewer repositioning sessions.
Surface texture and underside design
The top surface of a stall mat should give your horse confident footing, and the underside should grip the floor. Hammer-top and studded designs serve both purposes well. The raised texture on the top improves traction for the horse, while the underside profile creates mechanical resistance against the base, making the mat far less likely to shift.
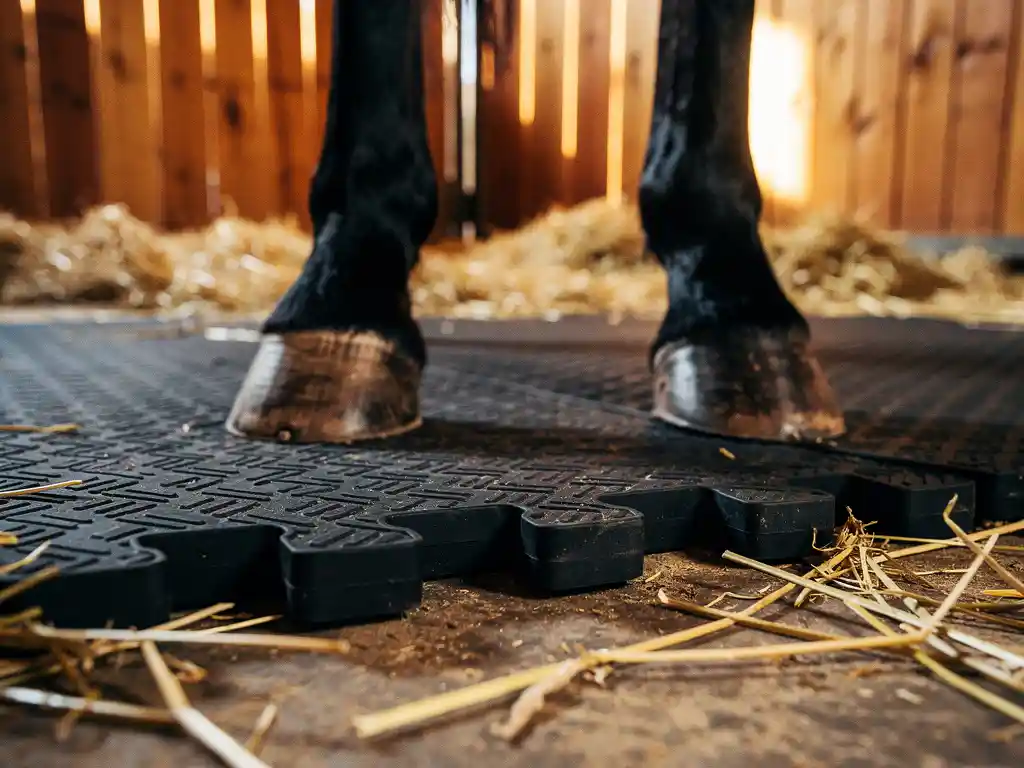
Interlocking mats are another strong option for stall floors. When mats connect to each other at the edges, they essentially become one large unit that resists movement as a whole rather than as individual panels. This is especially useful in larger stalls where a single mat cannot cover the full floor.
How do you prepare a horse stall floor before laying mats?
Before laying horse stall mats, clean the floor thoroughly, repair any cracks or low spots, and make sure the surface is completely level and dry. Any debris, moisture, or unevenness under the mat will cause problems with both stability and hygiene over time.
Start with a clean, solid base
Sweep or blow out all loose material, including old bedding, dirt, and dust. If you are working with a concrete floor, check for cracks or raised edges and grind them down if needed. Even small bumps can create a rocking effect under a stiff rubber mat, which leads to movement and premature wear at the edges.
For stalls with a compacted stone-dust or clay base, make sure the surface is firm and even. A soft or uneven base will compress unevenly under the weight of the horse, causing mats to shift and settle over time. Compact the base thoroughly before laying anything down.
Moisture is your biggest enemy
Laying mats on a damp floor traps moisture underneath, which creates hygiene problems and reduces friction between the mat and the base. Let the floor dry completely before installation, and if your stall has drainage issues, address those first. A dry, solid base gives your mats the best possible foundation for staying in place.
How do you install horse stall mats to prevent shifting?
To prevent horse stall mats from shifting, install them edge to edge across the full stall floor, push them tight against all four walls, and stagger seams between rows like brickwork. A full, snug installation leaves no room for mats to migrate and distributes horse movement evenly across the entire surface.
Cover the full floor with no gaps
Partial coverage is one of the most common installation mistakes. When mats don’t reach the walls, the horse’s hooves can catch the exposed edge and lever the mat out of position. Fit mats as tightly as possible against walls, door frames, and any fixed features in the stall. If standard sizes don’t quite reach, a made-to-measure option eliminates that problem entirely.
Stagger your seams
If you are using multiple mats to cover a large stall, stagger the joints between rows rather than lining them up. This brickwork pattern means no single seam runs the full width of the stall, which makes the whole floor more structurally stable and reduces the chance of any one mat sliding out of position.
Start from the center or a fixed corner
Begin laying mats from the most stable reference point in the stall, usually a fixed wall or corner. Work outward from there so that the last mats you place are the ones that get trimmed or adjusted to fit. This approach keeps the core of the floor tight and only requires fitting at the perimeter.
Should you glue down horse stall mats to keep them in place?
Gluing horse stall mats is an option, but it is not always necessary and comes with real trade-offs. Adhesive works well for permanent installations on flat concrete, but it makes future removal for cleaning or replacement much harder. In most cases, a well-fitted, heavy-mat installation holds without glue.
If you do choose to use adhesive, make sure you select a product that is specifically compatible with rubber and safe for animal environments. Standard construction adhesives can off-gas chemicals that are harmful to horses, and some will actually degrade rubber over time. Always check the product specifications before applying anything in a stall.
A better alternative for many setups is a fastening system designed specifically for rubber mats on barn floors. Our patented Slat Mat Fastener, for example, uses an all-rubber, animal-friendly design to hold mats securely in place without any chemicals. It is built to be unbreakable in tough barn conditions and keeps mats exactly where you install them without the permanence of glue.
For horse stalls specifically, many horse owners find that the combination of heavy mats, full coverage, and tight wall-to-wall fitting eliminates the need for any adhesive at all. Save the glue for situations where the base is genuinely problematic or where a mat must cover an irregularly shaped area.
What are the best ways to stop horse stall mats from creeping over time?
The best long-term strategies to stop horse stall mats from creeping are using large, heavy mats with textured undersides, filling the stall completely edge to edge, using interlocking designs or fasteners at seams, and checking and resetting mats as part of your regular stall maintenance routine.
Creep happens gradually, so catching it early makes the reset much easier. A quick check during your daily stall cleaning takes seconds and prevents small shifts from becoming big gaps. If you notice a mat moving consistently in one direction, it usually means there is a low spot in the floor pulling it that way, or a gap at the wall giving it somewhere to go.
Reducing your bedding depth can also help. Deep bedding can actually work against mat stability by allowing mats to shift under the loose material. Many horse owners find that good rubber matting lets them significantly reduce bedding depth, which is also a great way to reduce horse bedding costs over time. Less bedding means less material for mats to move through, and it means your floor stays cleaner and more consistent.
Using larger mats with fewer seams is one of the most effective long-term solutions. Fewer joints mean fewer opportunities for movement. We offer some of the largest mats available in the industry, which simplifies installation and reduces the total number of seams in any stall. For stalls with unusual dimensions or shapes, our custom rubber matting solutions are cut to your exact specifications, so every edge fits tight against the wall from day one—no trimming, no gaps, and no creeping over time.
Frequently Asked Questions
How often should I check and reset my horse stall mats?
A quick visual check during your daily stall cleaning is usually enough to catch early shifting before it becomes a bigger problem. Give mats a firm push with your foot along the seams and edges once a week to make sure everything is still tight. If you are resetting mats more than once a month, that is a sign something needs to be addressed at the installation level, whether that is the base, the mat size, or the use of fasteners.
Can I use horse stall mats on a dirt floor, and will they still stay in place?
Yes, rubber stall mats can be used on a well-compacted dirt floor, but staying power depends heavily on how firm and level that base is. Loose or soft dirt compresses unevenly under horse traffic, which causes mats to shift and settle over time. If you are working with a dirt floor, compact it thoroughly and consider adding a layer of compacted stone dust for a firmer, more consistent surface before laying your mats.
What is the best way to cut rubber stall mats to fit around door frames or irregular stall shapes?
A sharp utility knife with a fresh blade is the most practical tool for cutting rubber stall mats on-site, though a circular saw with a fine-tooth blade works well for long straight cuts. Make a cardboard template first for any irregular shapes, like around door frames or posts, to avoid costly cutting mistakes on the mat itself. For complex stall layouts or unusual dimensions, ordering custom-cut mats is worth considering, since factory-cut edges fit tighter and cleaner than field cuts.
Is it safe to use any rubber mat adhesive in a horse stall, or are there specific products I should look for?
Not all adhesives are safe for use in animal environments. You should specifically look for products labeled as non-toxic, low-VOC, and rubber-compatible, and always allow full cure time and ventilation before returning your horse to the stall. Avoid standard construction adhesives, as many off-gas harmful chemicals and can actually break down rubber over time. When in doubt, a rubber-specific mat fastener system is a safer and more reversible alternative to any adhesive.
My mats keep shifting in one specific corner of the stall. What is causing that and how do I fix it?
Consistent movement toward one area almost always points to either a low spot in the floor pulling the mat downhill or a gap at the wall giving the mat somewhere to go. Check the floor level in that corner with a long level or straight edge, and fill any dips with a floor-leveling compound before resetting the mats. If the wall fit is the issue, trim or replace the mat in that corner so it sits flush, or use a fastener at that edge to anchor it in place.
Do interlocking rubber mats work better than standard flat-edge mats for preventing shifting in horse stalls?
Interlocking mats offer a real advantage in larger stalls where multiple panels are needed, because the connected edges cause all the mats to behave as a single unit rather than independent pieces. This significantly reduces the chance of individual panels migrating away from each other over time. That said, interlocking designs are only as effective as the installation around them, so full wall-to-wall coverage and a level base still matter just as much as the mat style itself.
How much can switching to rubber stall mats actually reduce my bedding costs?
Many horse owners report reducing bedding depth by 50% or more after switching to quality rubber matting, since the mats themselves provide cushioning and insulation that bedding previously had to supply. Less bedding needed per stall adds up quickly across a full barn, and it also means less time and labor spent mucking out and replacing material. The exact savings depend on your horse's habits and your stall management routine, but for most operations the mats pay for themselves within one to two years through bedding costs alone.